
Drain Removal
Drain Removal
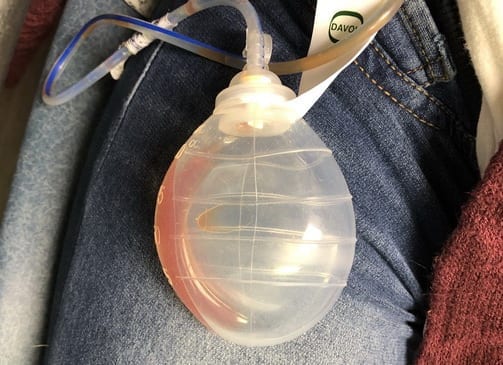
I always place a drain when I perform a cleft-lift, and it needs to be removed at some point after the surgery. Usually, it is around post op day five to seven, but sometimes it has to remain in longer because of excessive output. I need the total 24 hour output to be at or below 20 cc/day. If you went home with a drain in place, I will want you to communicate with me before removing it. This is called a “closed suction drain” or a “Blake Drain”, or is often inaccurately called a “JP Drain” (this is short for Jackson-Pratt Drain, which is similar to a Blake Drain).
In order to remove the drain:
- The drainage should be at or under 20 cc per day
- The character of the fluid should not look infected
- There should not be any redness of the incision suggesting infection
- There should be no fluid draining through the incision or around the drain at the point where it enters the skin.
- Pain should be improving daily, rather than worsening.
If you are going to do this at home, or have it removed by a local health care individual, it is best that you send me a photo of:
- The drain output record
- The incision from top to bottom
- The color of the drainage
With that information, I can tell if it safe to remove the drain, and give you the go-ahead to proceed.
If you are coming to my office for me to remove it:
There is no specific preparation, other than bringing the drain output record.
How painful is drain removal?
Most patients feel no pain, or just a little discomfort as it is removed. It is an unusual patient who finds it uncomfortable. Some patients take extra pain medication before the office visit – but usually agree afterwards that it wasn’t really necessary.
Instructions for drain removal
The procedure is the same whether this is done by a family member or health care personnel:
- Remove any tape holding the drain in place and any dressing over the drain insertion site.
- Cut the black suture holding the drain in place. It is a loop, and be careful to only cut one limb of the loop.
- Slowly withdraw the drain. It is very smooth and should come out very easily. The part inside is about 4″ long.
- Place a dry dressing over the hole where the drain entered the skin. This is to keep any additional drainage off clothing. Do not put any ointment on the hole. Change the dressing daily until it develop a scab, at which point a dressing is not needed. It is OK to remove the dressing and shower at any point.
- If there was any redness around the drain site, it will usually quickly resolve once the drain has been removed.
- Please send me photos of the entire incision two weeks after drain removal.
- Remember, to remove the Steri-Strips two weeks after surgery.
- Below is a short video of how it looks when a drain is removed.